


Not just anyone can publish ads on Google. Before you start reading, it is recommended to review this to consider it before beginning the design process.
To create ads for Google in HTML5, it is always necessary to install the Google Web Designer design program. Only from there will you be able to see which functions are allowed and which are not.
Initially, you must configure the type of ad (1), environment (2), dimensions (3), and animation mode (4) that will be used—it is not necessary to animate, but defining an environment is required.

1. Ad
The recommended types of ads are Banner and AMP HTML Banner. The first of these is the most common for web ads. The second is generally used for fast-loading ads on mobile devices. Depending on the type of ad you select, some functions will be available while others will not.
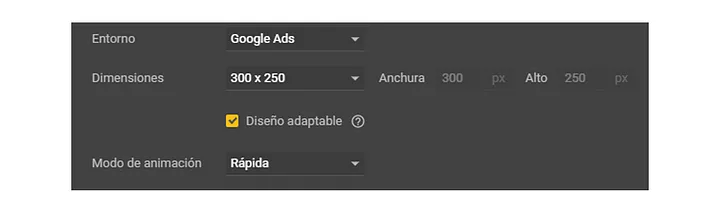
2. Environment
Regarding the environment, Google Ads is used. The selection is made based on where the work will be published. Depending on the selection, some options may not be available. Additionally, the program runs different enablers, which are predefined functions for loading the ad on the web. You can see the options according to the type of ad here.
3. Dimensions
The dimensions or size are set arbitrarily based on what you want to design. Later, when generating the file, you will need to work with breakpoints (critical screen width measurements) for different sizes, adjusting or rearranging the elements of the composition accordingly.
Important: check the Responsive Layout box to later configure the design according to the measurements.
4. Animation mode
An animation environment must always be defined even if you are not going to animate. The quick mode allows for frame-by-frame animation (used for creating stop motion) to move the elements of the composition. The advanced mode allows for animation using keyframes, which is usually smoother.
Once inside, you can design on the blank canvas, or if you prefer, you can do it in the code view by accessing it from the button in the top right corner.
You can see that its interface is very similar to other design programs like Illustrator, Photoshop, or XD, however, it has other alternatives related to HTML and CSS. It also has, on the left side, an ad validator, which shows if the elements added to the ad are, for example, compatible with the selected environment or if the ad size does not exceed the maximum accepted.
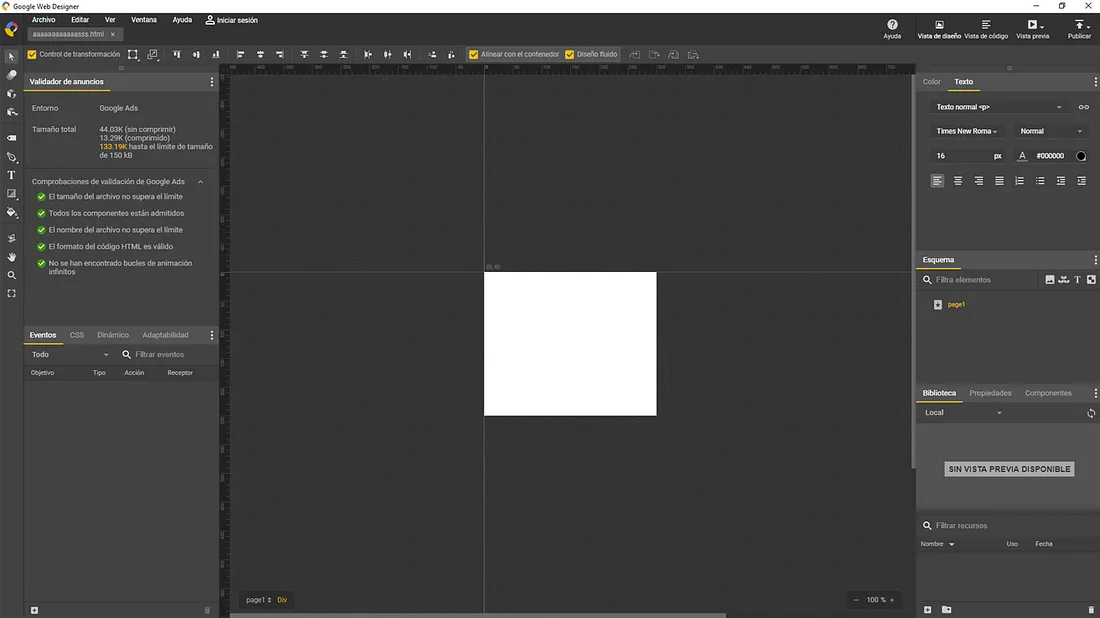
To load the elements we will use in our design, it is necessary to do so beforehand from the Library tab. From here, we will arrange the elements on the canvas as needed. To see the CSS properties of each element we place, you can click on it and go to the CSS > Styles window.
After placing all the elements considered important in the design, it's necessary to start adjusting them for different screen sizes. For this, you need to go to Adaptability > Media rules. There, you define the sizes and can move, rotate, resize, show/hide elements. At the interface level, the breakpoints colorize the rules to be identified more clearly.
Adjusting the breakpoints can be tedious because you have to adjust the properties of each element for each of the established dimensions. For this, there is the Properties window where each of the elements is listed. You can preview how it looks at different sizes with the Preview button (make sure, if necessary, to have the adblock disabled).
To export, you need to go to the top right corner, to the Publish option, and then press Locally. This will generate a .zip file.
It's important to consider that when uploading the file, you may encounter various errors. Here are some solutions. For example, an error that may occur is generating clickable areas within the ad, such as a button. Ads are usually fully clickable, so by delineating these areas, the file conflicts.
In summary, and as a first experience with this design software, it's important to be very careful with what is pre-defined. This can cause everything designed to not work and thus, waste time. It is always recommended to read documentation before establishing the parameters that were defined earlier.

Garage Labs
Official publications from the technology consulting firm Garage Labs | Santiago, Chile


